11 Easy Steps to an Organized Playroom: Simple Solutions for Kids to Clean-Up Their OWN Toys
This will also encourage more self-play and less screen-time
By: Jenny Dietsch, Certified Professional Organizer
CEO of Getting it Done Organizing in Dallas, Texas
December 2019
Do you struggle to get your kids to clean up their own messes? You are not alone! Jenny Dietsch, Certified Professional Organizer, founder of Getting it Done Organizing, has the solutions you are looking for. She helps busy families all over the U.S. create aesthetic and functional home systems.
Jenny works with families to create spaces that promote productivity and efficiency. Her background in managing her own family and work-life helped her to recognize the importance of day-to-day organization. Kids can’t put away their toys if there is no system of organization in place. It is also unfair to get mad at your children for not putting their things away if there is no designated space for their things to go.
11 Easy Steps for Creating an Organized Playroom:
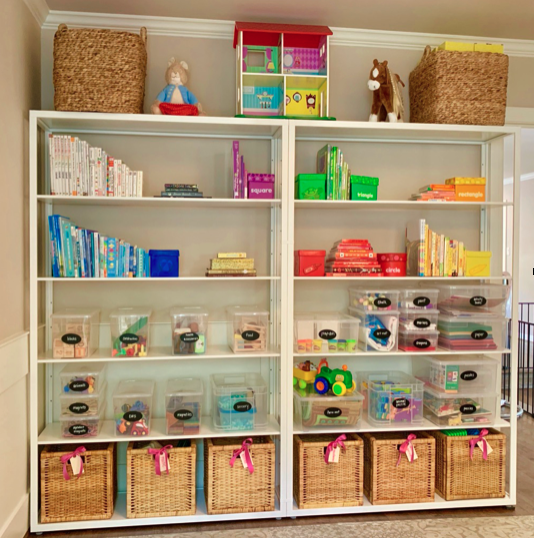
As parents, we want to keep our kids away from screen-time as much as possible. One way to do that is to create a simple, clean, and organized play space that has a table for crafting, bins for Legos, a shelf for puzzles, basically, a designated space for everything. If the space has a clear, easy-to-use system, then it can be cleaned up in a matter of minutes. Don’t be afraid of the mess! Playrooms are supposed to get messy. If your system works, then clean-up will be a breeze.
All you need to do is get organized. Usually a parent or other adults, such as a babysitter or professional organizer needs to initiate and create a system and then demonstrate to children how the system works. This system should be user-friendly, easy to maintain, and labeled. We like clear bins, so even kids who can’t read know where things go. Then, give your kids the responsibility to own their space. Tell them that it is now their job to clean-up after themselves.
- Take everything out, sort, and categorize.
Pull all of the toys, games, and art supplies out into one big pile. Sort everything into their categories. Keep categories general rather than overly specific. This helps with seeing what you have doubles of, things kids have never used, and what may need to be replaced.
When you start organizing, it’s easy to get lost in it, so don’t kill yourself with the Legos. All of your loose Legos can go in one large bin with a lid. Life is too short to sort by color, size, set! Mixing the Legos also allows your kids to use their imagination to create their own masterpieces. Additionally, Lego publicizes a free Lego magazine for kids featuring pictures of kids with their unique creations. This may motivate your child to make something cool so they can get into the magazine.
2) Purge toys, games, and puzzles.
Toss any broken toys, and any games or puzzles with missing pieces dried up markers, or anything that is no longer useful. Make a donation pile for items that your children may have outgrown but are still usable. Thrift stores love your discarded toys, and your donations can make some other children very happy!
It is good to regularly purge items that are no longer intact, functional, or in age-appropriate for your kids to keep it streamlined. Specifically, after a birthday or holiday, lots of things can creep in and sabotage your system. It’s good to do a refresh before these events and parties! Plus, the holiday season is an excellent time to donate gently used toys.
3) Clean the space.
Take advantage of the fact that the space is empty. Disinfect with Clorox wipes, dust, vacuum, and clean the baseboards.
4) Assess what containers and baskets you have that can be used.
We recommend using various sizes of clear bins with labels (plus these markers!), wide-mouthed open lidded tubs and baskets, and bookshelves. We also love these baskets for blankets and stuffed animals, these clear bins for art supplies, and this style container for larger toys.
5) Measure your existing shelves, cabinets, closet space, etc.
Measuring is your best way to ensure you get exactly what you need from the store!
6) Go shopping for the necessary supplies to make your system a success.
Purchasing organizing products does not have to cost a fortune. There are products for every budget. You can shop anywhere, but our favorite places to shop are Amazon, Target, and The Container Store!
7) Put the toys away!
It’s finally time to clean up and organize! Put your sorted toys and art supplies into their appropriate bins. Group together similar items by creating “zones” such as crafting, games, Legos, trucks, dolls, etc.
8) Label, label, label.
Each bin should have a label on it to show what’s inside. Click here to see our favorite labels and here for our favorite label marker. For kids who don’t read yet, we love these photo labels. On a budget? You can use painter’s tape and a sharpie to achieve the same result for less!
9) Show your children this new system and that everything now has a designated home.
Now that a system has been created, it’s the parent’s responsibility to teach their kids to use it! Our systems are easy for kids to understand, and we love to hear all of the ways parents make cleaning up fun for their kids!
10) Let the kids play!
It’s time for your children to have fun, enjoy their toys, and make a mess. It is, after all, what they do best!
11) Watch as the kids tidy up their own playroom!
It’s so simple when they know where things belong!